Windows下sentry接入C/C++程序的详细过程
sentry简介
首先,如果你是为工作而做,公司一定有自己的sentry账号,去找他们申请权限吧;如果是学习或自己用,先去这里申请一个账号sentry.io。记得,绑定的邮箱很关键,之后的所有崩溃、消息、异常sentry都会发送邮件给你
sentry的作用
为大家通俗的总结:针对开发中的项目,即使我们做足了一切的排查,可仍然有出现crash(崩溃)的可能,这是我们必须承认的;或者,有些时候我们使用try catch,对于某些catch我们很希望知道它的触发率是什么。因此,sentry的本质就是做这样的工作:为我们的工程上一层保险,让我们开发人员能随时知道自己维护的项目是怎样的状态
举个例子:让大家感受一下

例如:这里的项目,我们可以清楚的看到,崩溃触发率等很多我们关心的内容
下方的图片,我们甚至可以清楚的定位到,本次crash发生在线程29428,SentryTest.exe中main函数的71行

这里只举了两个最最基本的例子,但已经能看到sentry的强大。
sentry-native是什么
sentry作为一个开源的软件,发展至今,已经非常成熟。它支持的平台众多,甚至于针对不同的工作者(后台、前端、客户端)都有相应的内容。而我们本次讨论的是针对C/C++的版本
sentry官方GitHub链接
基于C/C++的native版,SDK编译
有一点我在这里吐槽一下:sentry的官方只给了源码和编译方法,为什么不送佛送到西,给咱们把SDK编译好!!!(如果你熟悉vckpg,其实vckpg可以直接集成sentry)
sentry-native C/C++版本源码
1.截至到我写这篇博客,更新到0.5版本,使用可以将其对于的zip下载即可
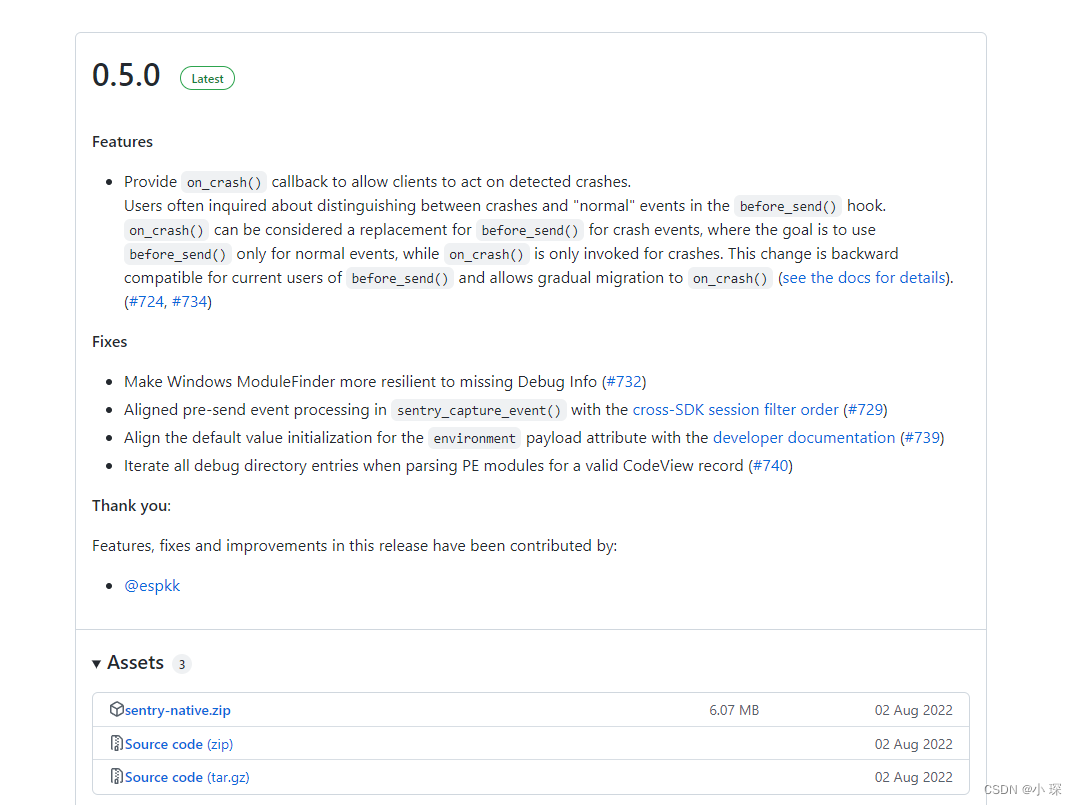
2.开始编译工作
我只能说,这里的编译应该是他们的疏忽,官方给的流程中有一些问题,我将整个流程进行汇总,并将有问题的地方在后面标注(希望在你使用的时候,这些问题已经被修复)
- sentry的SDK构建借助的是CMake,在你下载的工程目录下,打开cmd

如果你的开发环境是 macOS ,流程如下
# Configure the CMake build into the `build` directory with crashpad (the default
# backend on macOS, thus optional to specify). Specifying `RelWithDebInfo` as the
# `CMAKE_BUILD_TYPE` is also optional because it is the default in sentry-native
# for all generators supporting it.
cmake -B build -D SENTRY_BACKEND=crashpad -D CMAKE_BUILD_TYPE=RelWithDebInfo
# build the project
cmake --build build --parallel
# install the resulting artifacts into a specific prefix
cmake --install build --prefix install
# which will result in the following (on macOS):
exa --tree install --level 2
install
├── bin
│  └── crashpad_handler
├── include
│  └── sentry.h
└── lib
 ├── cmake
 ├── libsentry.dylib
 └── libsentry.dylib.dSYM
如果你是在Windows下,流程如下
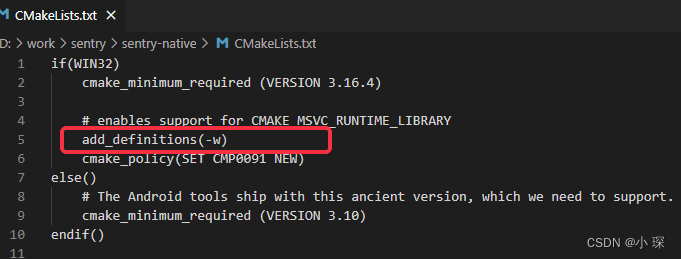
# The msbuild generator ignores the CMAKE_BUILD_TYPE because it contains all
# build-types. Here we leave out the backend specification and rely on CMake
# selecting crashpad as Windows' default backend.
cmake -B build
# The actual build step then requires we specify which build-type we want
# to apply via the `--config` parameter. Please be aware that in msbuild
# projects, the `--parallel` option has no effect.
cmake --build build --config RelWithDebInfo
# install the resulting artifacts (again requiring build-type!)
cmake --install build --prefix install --config RelWithDebInfo
# which will result in the following output (ignoring non-essential lines):
tree /f install
├───bin
│       crashpad_handler.exe
│       crashpad_handler.pdb
│       sentry.dll
│       sentry.pdb
│
├───include
│       sentry.h
│
└───lib
  │   sentry.lib
接下来,进行问题的解决(如果没有问题,忽略这些内容):
0.5版本整个工程编译都会报警告:提示修改文件为Unicode。这是因为这些文件是他们在Linux下做的,所以文件都是UTF-8无签名,而Windows下需要UTF-8带签名。但文件这么多,如果一个个在visual stdio下改不现实,因此,打开CmakeList,将警告忽略,添加一句代码:add_definitions(-w)
一定要注意,上图的例子是我在Windows下做所以写在这里,如果你是Mac下,就要写在外面
工程里面给的example部分,竟然有语法错误。。。这我真没想到。解决办法:自己打开visual stdio解决一下,或者另一个方式,忽略即可,只要正常编译出来了dll、lib、exe即可。
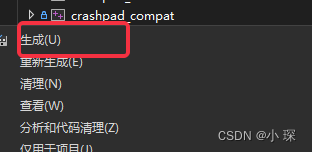
或者打开build目录,cmake成功后,会生成解决方案,用visual stdio打开,这里一定要将编译方法选为下图这个

接着,对每一个项目(有问题的RUN_TASK略过)进行生成
如果你要编译x86版本,除了在vs下将所以相关x64的设置都改成x86或win32,也许还会遇到这个错误:模块对于 SAFESEH 映像是不安全的错误。解决方法是,对于出问题的模块,属性->链接器->命令行->添加:/SAFESEH:NO
暂时就这么多错误,如果你还有其它的错误,百度搜一搜,或问问大佬,别放弃,想想我当时也很难的!!!
sentry-SDK接入本地工程
接入我们自己的工程
接下来,我们将编译好的SDK接入工程,注意:我所有的操作都是以Windows下例子,如果你是后端,去看对应的官方文档吧 sentry入口
ps:SDK,就是我们编译出来的sentry.dll、sentry.lib、crashpad_handler.exe,sentry.h通俗来讲就是可以直接集成到我们工程里的内容。
接下来的操作,熟悉代码编译原理和程序运行原理的朋友一定觉得我啰嗦
1.熟悉代码编译原理和程序运行原理的朋友一定不陌生,一个接入的SDK想要成功编译,需要将头文件引入

2.lib库是头文件中那些函数的具体实现,你需要在你的工程中将其链接进来,可以使用 #pragma comment(lib, “sentry.lib”)手动链接,亦可以在链接器中添加(一定要链接成功,否则编译的时候会报错)

3.sentry.dll是编译出来的程序正常运行需要的动态库,你需要将它和编译出来的内容放到同级目录下,否则编译出来的exe是无法正常运行的。
4.crashpad_handler.exe,这是sentry执行崩溃操作的exe,也就是说,我们调用的接口,最终都是它来执行操作。因此,想让sentry正常工作,需要将它和编译产物放到一起(和sentry.dll一样)。
关于配置
一些必要信息的初始化
记住一句话,sentry的初始化越早越好,始终记得,你的目的是让sentry监控你的项目状态。
这里先上一段代码吧
#include <sentry.h>

int main(void) {
sentry_options_t *options = sentry_options_new();
sentry_options_set_dsn(options, "https://examplePublicKey@o0.ingest.sentry.io/0");
sentry_options_set_release(options, "my-project-name@2.3.12");
sentry_options_set_debug(options, 1);
sentry_options_set_environment(options, "production");
sentry_options_set_database_path(options, ".native");
sentry_init(options);

/* ... */
}
上面的代码完成了基本的初始化,也就是说sentry已经可以正常工作了,接下来细说
1.初始化用到的对象
sentry_options_t *options = sentry_options_new();这段代码中options就是后面需要用的对象,或许你可以把它的定义放到类内成员函数处dsn
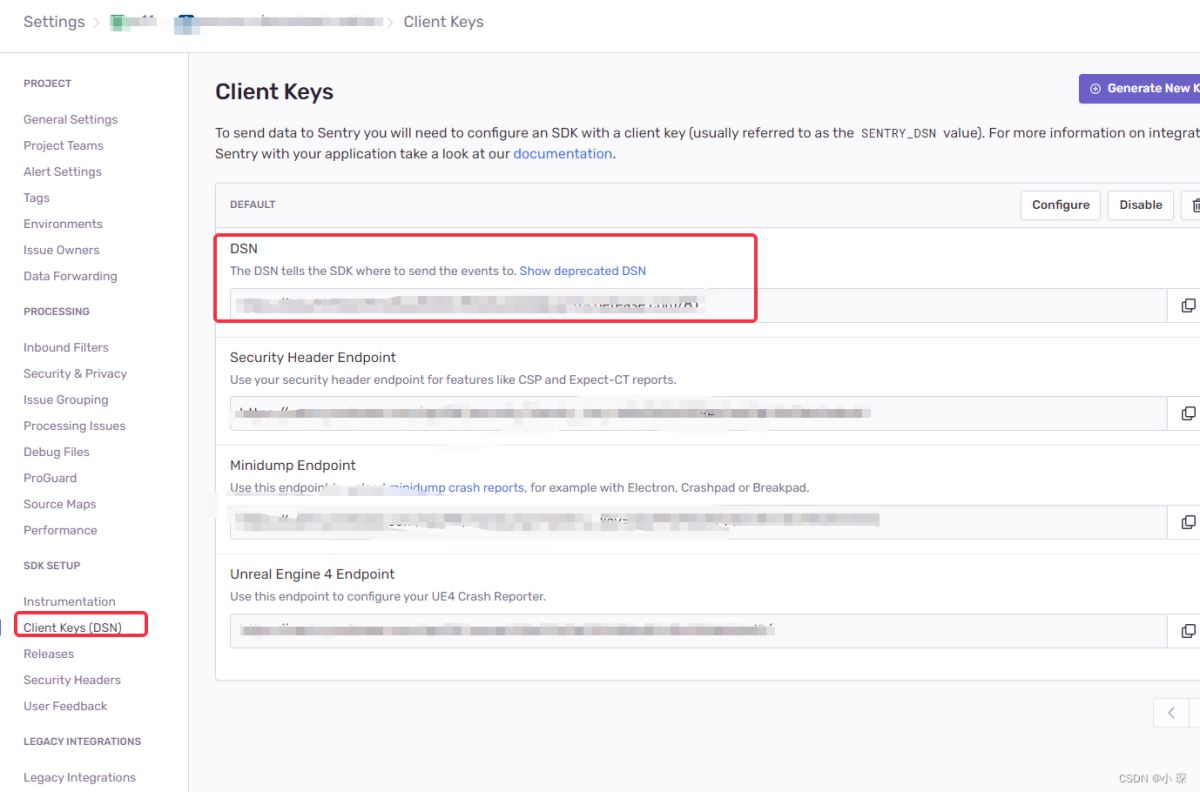
2.DSN告诉 SDK 将事件发送到哪里。如果未提供此值,SDK 将尝试从SENTRY_DSN环境变量中读取它。如果该变量也不存在,SDK 将不会发送任何事件。
关于dsn的查看如下图,这个dsn是独有的,也是固定的,因此代码中可以直接写死,即调用sentry_options_set_dsn接口,第一个参数就是初始化的对象,第二个参数即dsn地址,是一个字符串
3.Release版本
通常你的产品有多个不同版本,有些时候你可能还需要对它们进行区分,如下图,你可以清晰的看到每个版本的表现

使用sentry_options_set_release(参数1,参数2);参数1为初始化对象,参数2为具体版本(一个字符串)
4.触发环境
有些时候,你的产品可能面向多种用户,例如:product、develop、test。设置环境去进行区分
sentry_options_set_environment(参数1,参数2);参数1为初始化对象,参数2为环境(一个字符串)
5.日志目录
sentry的运行是会产生目录的,如果不设置,就会以当前路径为默认目录,在一些面向用户的产品中,这是肯定不允许的,也许你需要将它设置为temp临时目录下去
sentry_options_set_database_path(参数1,参数2);参数1为初始化对象,参数2为目录路径(字符串,绝对路径和相对路径均可)
自定义配置
有些时候,你可能需要一些其它信息来辅助你排查错误,或者是处理后续的事宜,这里列举几个,可以选择性参考
添加一个自定义content字段
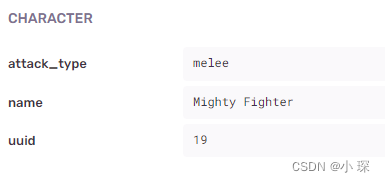
例如上图,这个character字段就是我自己添加的。
下面的函数是我自己封装的函数,第一个参数为自定义的内容,例如:character,第二个参数为一个map,输入你希望的信息,例如:uuid:19,name:Mighty Fighter,都是调用了sentry SDK接口。在需要添加信息的地方使用即可
void addContext(const char* contextName, std::unordered_map<char*, char*> textContent)
{
  if (contextName == nullptr || textContent.empty()) {
      return;
  }
  sentry_value_t character = sentry_value_new_object();

  for (auto it = textContent.begin(); it != textContent.end(); it++) {
      sentry_value_set_by_key(character, it->first, sentry_value_new_string(it->second));
  }

  sentry_set_context(contextName, character);
}
丰富本次触发的用户信息
下面的函数是我自定义的,为本次在触发添加用户信息,这里添加了触发的ip地址和uuid,当然你也可以自定义其它内容。注意:sentry可以自动拿到ip地址,格式如下面的代码:sentry_value_new_string(“{{auto}}”)
void addUser(const char* ipAddress, const char* uuid)
{
  if (uuid == nullptr) {
      return;
  }
  sentry_value_t user = sentry_value_new_object();
  if (ipAddress == nullptr) {
      sentry_value_set_by_key(user, "ip_address", sentry_value_new_string("{{auto}}"));
  } else {
      sentry_value_set_by_key(user, "ip_address", sentry_value_new_string(ipAddress));
  }

  sentry_value_set_by_key(user, "uuid", sentry_value_new_string(uuid));
  LOG_INFO << "[SentryReporter::addUser]: add User: uuid: " << uuid;

  sentry_set_user(user);
}
利用sentry监视崩溃
在完成所有的初始化工作后,sentry就可以为你的工程进行监控了,在出现crash时,即可向你的客户端发送报告。

崩溃回调
sentry提供了崩溃回调函数,什么作用呢?在发送crash时,sentry会执行它的所有工作,拦截+上发,但在这之前,如果你想做一些其它的事情,也是可以的,看如下代码:
sentry_value_t SentryReporter::onCrashCallback(
  const sentry_ucontext_t* uctx, // Crashed user space context
  sentry_value_t event,
  void* closure                  // User data that provide during configuration
)
{
  const std::wstring uuid = APP->getMainWindow()->getUUID();
  addUser(nullptr, Utils::StringUtils::ws2s(uuid).c_str());

  //if you want to give up this crash,Add a judgment method and make the following if true
  if (GIVE_UP_CRASH) {
      sentry_value_decref(event);
      return sentry_value_new_null();
  }

  return event;
}

//----------------初始化时添加-------------------------
sentry_options_set_on_crash(optioning, onCrashCallback, NULL);
代码中,实现了一个函数onCrashCallback,并在sentry初始化时进行绑定,这样做之后,就可以达到上面说的效果。
你可以在崩溃回调函数中做一些操作,例如:添加一些附加信息,又或者调用接口放弃上传此次崩溃
一定要注意,sentry没有做线程安全处理,因此这里的崩溃回调函数一定要轻量级,不要做过重的计算操作
手动发送异常、消息
sentry的另一种用法就是我们手动上发事件,举个例子:代码中try catch,我希望得知某些catch的触发率,就可以在对应的catch处进行一个手动的数据上发。
看如下代码:
void capturingErrorsWithStacktrace(const char* errorMessage)
{
  sentry_value_t event = sentry_value_new_event();

  sentry_value_t exc = sentry_value_new_exception("Exception", errorMessage);
  sentry_value_set_stacktrace(exc, NULL, 0);
  sentry_event_add_exception(event, exc);
  LOG_INFO << "[SentryReporter::capturingErrorsWithStacktrace]:sentry sent error,message: " << errorMessage;

  sentry_capture_event(event);
}

void capturingMessages(sentry_level_t level, const char* logger, const char* message)
{
  if (logger == nullptr || message == nullptr) {
      return;
  }

  sentry_value_t event = sentry_value_new_message_event(level, logger, message);
  LOG_INFO << "[SentryReporter::capturingMessages]:sentry  sent message,level: "
      << level << "logger: " << logger << "message: " << message;

  sentry_capture_event(event);
}
上面的两个函数,一个可以手动发送错误、一个可以手动发送一个自定义消息,这里就不讲述了,自己看代码理解一下。
消息回调
与crash回调一样,手动发送的消息也可以有回调函数,这里直接给出实现,原理请看上文:
/*
* This function sends an error or message manually to make a callback
* You can do some operations, such as adding information
*/
sentry_value_t SentryReporter::beforeSendCallback(sentry_value_t event, void* hint, void* closure)
{
  //do something before send
  return event;
}


//---------------------设置发送消息回调--------------------------
sentry_options_set_before_send(m_pOptions.get(), beforeSendCallback, NULL);
上传PDB,直接定位崩溃发生的位置
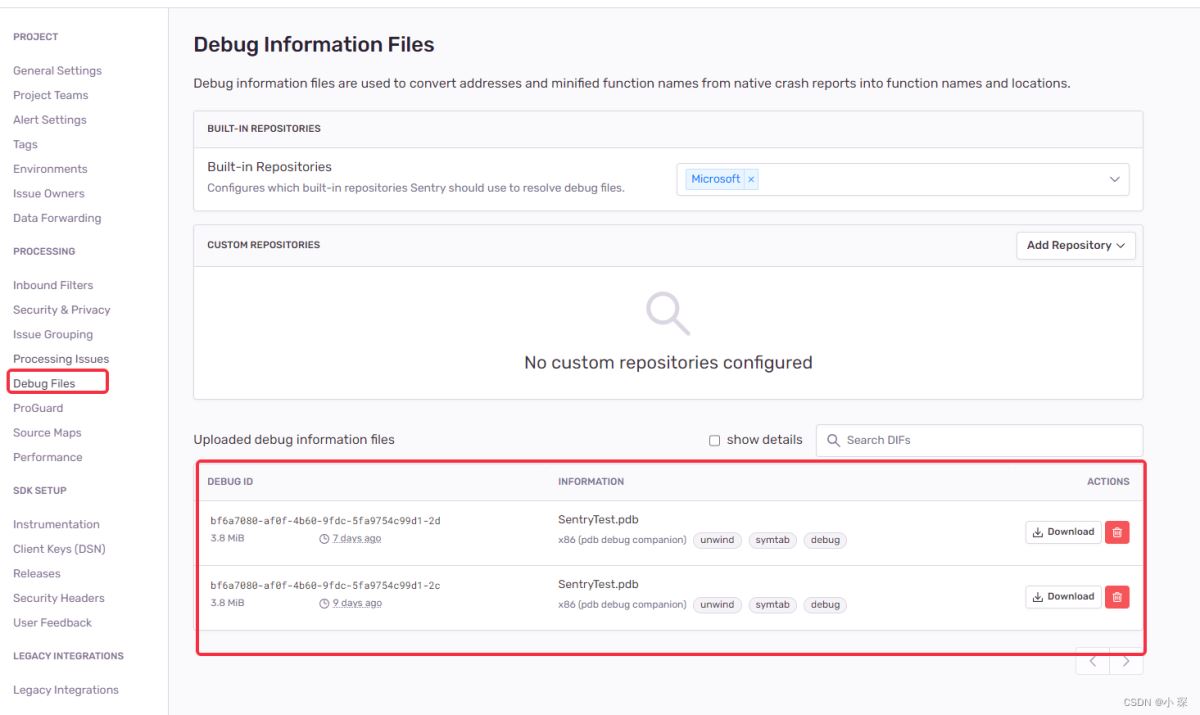
sentry的另一个强大之处,在于当发生崩溃时,它不仅可以及时捕捉并上报,还可以配合正确的PDB(Windows下的调试文件),精确的定位到发生crash的exe或dll,甚至可以定位到具体哪一行代码
- 适用于 iOS、iPadOS、tvOS、watchOS 和 macOS 的dSYM 文件
- 适用于 Linux 和 Android (NDK) 的ELF 符号
- 适用于 Windows 的PDB 文件
- 适用于所有平台的Breakpad 符号
- WebAssembly 的WASM 文件
- 适用于 Java 和 Android 的ProGuard 映射
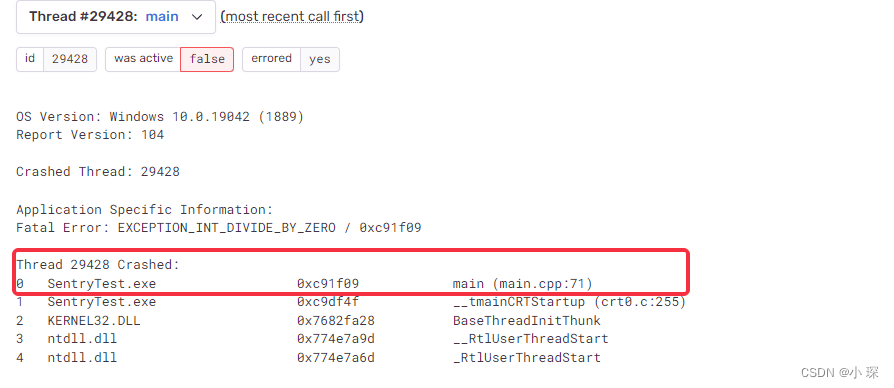
崩溃发生在线程29428,SentryTest.exe中main函数71行
流程如下:
1.最直接的方式是借助第三方的工具sentry-cli.exe,下载链接,下载下来的内容仅仅一个sentry-cli.exe,在cmd下利用该exe进行操作即可
2.首先,你可能需要先对身份进行配置,cmd下该命令,其中如果你是使用的自己项目组或公司的sentry,需要将https://myserver.invalid/换为自己项目的url,这里放置的url是sentry io的官方环境
sentry-cli --url https://myserver.invalid/ login
3.上传调试文件,这里以Windows下的pdb为例子
#首先对调试文件进行检查,是否格式正确
sentry-cli difutil check SentryTest.pdb
如果出现了类似以下内容,即为格式正确
Debug Info File Check
Type: elf debug companion
Contained debug identifiers:
  > 924e148f-3bb7-06a0-74c1-36f42f08b40e (x86_64)
Contained debug information:
  > symtab, debug
Usable: yes
接下来,将该文件上传,其中 < org >要换你的项目所在组织;< project > 要换位你的项目名称;后面的files则为具体文件,支持绝对路径和相对路径,且支持上传多个文件
sentry-cli upload-dif -o <org> -p <project> files...
出现类似如下内容,则上传成功
> Found 2 debug information files
> Prepared debug information files for upload
> Uploaded 2 missing debug information files
> File processing complete:

PENDING 1ddb3423-950a-3646-b17b-d4360e6acfc9 (MyApp; x86_64 executable)
PENDING 1ddb3423-950a-3646-b17b-d4360e6acfc9 (MyApp; x86_64 debug companion)
又或者,你可以去sentry项目处查看:
博主自己封装的sentry类
注意:这里的代码是不能直接用的,因为涉及到了一些信息的提取,需要根据自身项目进行适配,在对sentry有一定了解后,再来看
SentryReporter.h
#pragma once
#include "sentry.h"
#include "stdafx.h"
#include <iostream>
#include <string>
#include <unordered_map>

#ifdef ANDROID_SIX
const std::string SENTRY_DSN = "https://b2a9969e03944fae81a12cf84afa6bd2@sentry.netease.com/81";
#else
const std::string SENTRY_DSN = "https://ca88798ea2404243a3dc5a5e2ebdb670@sentry.netease.com/82";
#endif // ANDROID_SIX

const std::string DATABASE_NAME = ".sentry-native";
const std::string ENVIRONMENT = "production";

const bool GIVE_UP_CRASH = false;

struct SentryInitInfo
{
  std::string dsn;
  std::string databasePath;
  std::string releaseVersion;
  std::string environment;
  std::string nemuDownloadLog;
  float sampleRate;//Range must be within :0-1
  int maxBreadcrumbs;//default:100
  bool attachStacktrace;//default:false
};

class SentryReporter {

public:
  SentryReporter();
  ~SentryReporter();
  void setup();
  static void addContext(const char* contextName, std::unordered_map<char*, char*> textContent);
  static void addUser(const char* ipAddress, const char* uuid);//if ipAddress = nullptr,get from system
  static void capturingErrorsWithStacktrace(const char* errorMessage);
  static void capturingMessages(sentry_level_t level, const char* logger, const char* message);

private:
  void fetchInitInfomation();
  static sentry_value_t onCrashCallback(const sentry_ucontext_t* uctx, sentry_value_t event, void* closure);
  static sentry_value_t beforeSendCallback(sentry_value_t event, void* hint, void* closure);

private:
  shared_ptr<sentry_options_t> m_pOptions;
  SentryInitInfo m_sentryInitInfo;
};
SentryReporter.cpp
#include "SentryReport.h"
#include "utils.h"
#include "VersionNo.h"
#include "MainWindow.h"

sentry_value_t SentryReporter::onCrashCallback(
  const sentry_ucontext_t* uctx, // Crashed user space context
  sentry_value_t event,
  void* closure                  // User data that provide during configuration
)
{
  const std::wstring uuid = APP->getMainWindow()->getUUID();
  addUser(nullptr, Utils::StringUtils::ws2s(uuid).c_str());

  //if you want to give up this crash,Add a judgment method and make the following if true
  if (GIVE_UP_CRASH) {
      sentry_value_decref(event);
      return sentry_value_new_null();
  }

  return event;
}

/*
* This function sends an error or message manually to make a callback
* You can do some operations, such as adding information
*/
sentry_value_t SentryReporter::beforeSendCallback(sentry_value_t event, void* hint, void* closure)
{
  //do something before send
  return event;
}

SentryReporter::SentryReporter()
  :m_pOptions(sentry_options_new())
{
  fetchInitInfomation();
}

SentryReporter::~SentryReporter()
{
  sentry_close();
  m_pOptions = nullptr;
}

void SentryReporter::fetchInitInfomation()
{
  m_sentryInitInfo.dsn = SENTRY_DSN;

  std::wstring databasePath = Utils::pathCombine(DCommon::DSystemUtils::getTempPath(), Utils::StringUtils::s2ws(DATABASE_NAME));
  m_sentryInitInfo.databasePath = Utils::StringUtils::ws2s(databasePath);

  m_sentryInitInfo.releaseVersion = Utils::StringUtils::ws2s(STRVERSION);
  m_sentryInitInfo.environment = ENVIRONMENT;

  std::wstring logFilePath = Utils::getLogFile();
  m_sentryInitInfo.nemuDownloadLog = Utils::StringUtils::ws2s(logFilePath);

  sentry_options_set_auto_session_tracking(m_pOptions.get(), false);
  sentry_options_set_symbolize_stacktraces(m_pOptions.get(), true);

  //use default value
  m_sentryInitInfo.sampleRate = 1;
  m_sentryInitInfo.maxBreadcrumbs = 100;
  m_sentryInitInfo.attachStacktrace = false;
}

void SentryReporter::setup()
{
  sentry_options_set_dsn(m_pOptions.get(), m_sentryInitInfo.dsn.c_str());
  sentry_options_set_database_path(m_pOptions.get(), m_sentryInitInfo.databasePath.c_str());
  sentry_options_set_release(m_pOptions.get(), m_sentryInitInfo.releaseVersion.c_str());
  sentry_options_set_environment(m_pOptions.get(), m_sentryInitInfo.environment.c_str());
  sentry_options_set_traces_sample_rate(m_pOptions.get(), m_sentryInitInfo.sampleRate);
  sentry_options_add_attachment(m_pOptions.get(), m_sentryInitInfo.nemuDownloadLog.c_str());

  sentry_options_set_on_crash(m_pOptions.get(), onCrashCallback, NULL);
  sentry_options_set_before_send(m_pOptions.get(), beforeSendCallback, NULL);

  int ret = sentry_init(m_pOptions.get());
  if (ret != 0) {
      LOG_INFO << "[SentryReporter::setup]: sentry init error";
  }
}

void SentryReporter::addContext(const char* contextName, std::unordered_map<char*, char*> textContent)
{
  if (contextName == nullptr || textContent.empty()) {
      LOG_INFO << "[SentryReporter::addContext]: contextName==nullptr or textContent==nullptr";
      return;
  }
  sentry_value_t character = sentry_value_new_object();

  for (auto it = textContent.begin(); it != textContent.end(); it++) {
      sentry_value_set_by_key(character, it->first, sentry_value_new_string(it->second));
  }

  sentry_set_context(contextName, character);
}

void SentryReporter::addUser(const char* ipAddress, const char* uuid)
{
  if (uuid == nullptr) {
      LOG_INFO << "[SentryReporter::addUser]: uuid==nullptr";
      return;
  }
  sentry_value_t user = sentry_value_new_object();
  if (ipAddress == nullptr) {
      sentry_value_set_by_key(user, "ip_address", sentry_value_new_string("{{auto}}"));
  } else {
      sentry_value_set_by_key(user, "ip_address", sentry_value_new_string(ipAddress));
  }

  sentry_value_set_by_key(user, "uuid", sentry_value_new_string(uuid));
  LOG_INFO << "[SentryReporter::addUser]: add User: uuid: " << uuid;

  sentry_set_user(user);
}

void SentryReporter::capturingErrorsWithStacktrace(const char* errorMessage)
{
  sentry_value_t event = sentry_value_new_event();

  sentry_value_t exc = sentry_value_new_exception("Exception", errorMessage);
  sentry_value_set_stacktrace(exc, NULL, 0);
  sentry_event_add_exception(event, exc);
  LOG_INFO << "[SentryReporter::capturingErrorsWithStacktrace]:sentry sent error,message: " << errorMessage;

  sentry_capture_event(event);
}

void SentryReporter::capturingMessages(sentry_level_t level, const char* logger, const char* message)
{
  if (logger == nullptr || message == nullptr) {
      return;
  }

  sentry_value_t event = sentry_value_new_message_event(level, logger, message);
  LOG_INFO << "[SentryReporter::capturingMessages]:sentry  sent message,level: "
      << level << "logger: " << logger << "message: " << message;

  sentry_capture_event(event);
}
关于Windows——sentry接入C/C++程序的文章就介绍至此,更多相关WindowsC++程序内容请搜索编程宝库以前的文章,希望以后支持编程宝库!
一、一些说明1.智能指针用于资源管理,为了保证资源的操作得到顺利的执行防止资源泄露,因此大多数实现都以noexcept在参数列表后声明为不抛出异常。2.对于有些明确不需要更改调用对象内容 ...