vue3+vite项目中使用svg图文详解
今天在vue3+vite项目练习中,在使用svg时,发现之前的写法不能用,之前的使用方法参考vue2中优雅的使用svg。
const req = require.context('./icons/svg', false, /\.svg$/)
const requireAll = requireContent => requireContent.keys().map(requireContent)
requireAll(req)
然后就各种资料查找,终于实现了,废话不多说,直接上代码:
stept1: 文件目录
stept2: 安装 svg-sprite-loader
npm install svg-sprite-loader -D
# via yarn
yarn add svg-sprite-loader -D
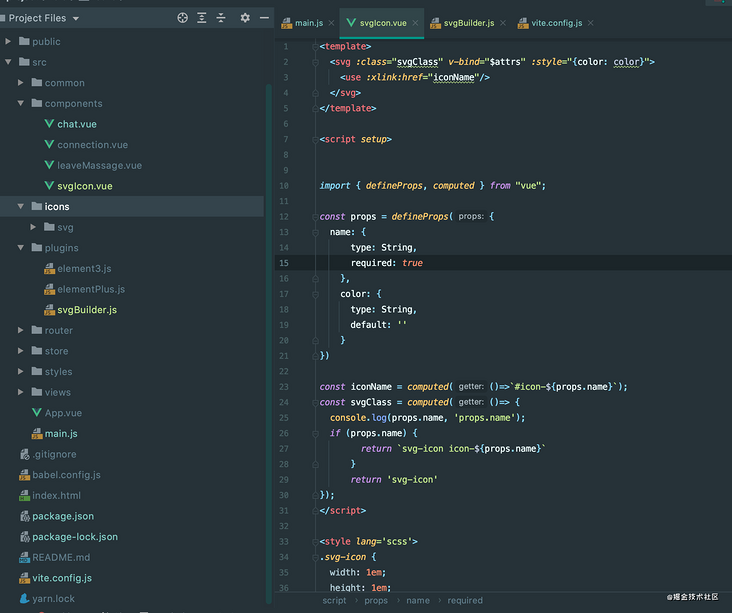
stept3: 创建svgIcon.vue文件
 <template>
<svg :class="svgClass" v-bind="$attrs" :style="{color: color}">
  <use :xlink:href="iconName" rel="external nofollow" />
</svg>
</template>

<script setup>


import { defineProps, computed } from "vue";

const props = defineProps({
name: {
    type: String,
    required: true
  },
  color: {
    type: String,
    default: ''
  }
})

const iconName = computed(()=>`#icon-${props.name}`);
const svgClass = computed(()=> {
console.log(props.name, 'props.name');
if (props.name) {
      return `svg-icon icon-${props.name}`
    }
    return 'svg-icon'
});
</script>

<style lang='scss'>
.svg-icon {
width: 1em;
height: 1em;
fill: currentColor;
vertical-align: middle;
}
</style>
stept4: 创建icons文件夹,存放svg文件
stept5: 在main.js里面全局注入svg-icon组件
import { createApp } from 'vue'
import App from './App.vue'

import svgIcon from './components/svgIcon.vue'

createApp(App).component('svg-icon', svgIcon).mount('#app');
stept6: 在plugins文件夹创建svgBuilder.js(重点来了), ts版本参考:https://github.com/JetBrains/svg-sprite-loader/issues/434
import { readFileSync, readdirSync } from 'fs'

let idPerfix = ''
const svgTitle = /<svg([^>+].*?)>/
const clearHeightWidth = /(width|height)="([^>+].*?)"/g

const hasViewBox = /(viewBox="[^>+].*?")/g

const clearReturn = /(\r)|(\n)/g

function findSvgFile(dir) {
const svgRes = []
const dirents = readdirSync(dir, {
  withFileTypes: true
})
for (const dirent of dirents) {
  if (dirent.isDirectory()) {
    svgRes.push(...findSvgFile(dir + dirent.name + '/'))
  } else {
    const svg = readFileSync(dir + dirent.name)
      .toString()
      .replace(clearReturn, '')
      .replace(svgTitle, ($1, $2) => {
        // console.log(++i)
        // console.log(dirent.name)
        let width = 0
        let height = 0
        let content = $2.replace(
          clearHeightWidth,
          (s1, s2, s3) => {
            if (s2 === 'width') {
              width = s3
            } else if (s2 === 'height') {
              height = s3
            }
            return ''
          }
        )
        if (!hasViewBox.test($2)) {
          content += `viewBox="0 0 ${width} ${height}"`
        }
        return `<symbol id="${idPerfix}-${dirent.name.replace(
          '.svg',
          ''
        )}" ${content}>`
      })
      .replace('</svg>', '</symbol>')
    svgRes.push(svg)
  }
}
return svgRes
}

export const svgBuilder = (path, perfix = 'icon') => {
if (path === '') return
idPerfix = perfix
const res = findSvgFile(path)
// console.log(res.length)
// const res = []
return {
  name: 'svg-transform',
  transformIndexHtml(html) {
    return html.replace(
      '<body>',
      `
        <body>
          <svg xmlns="http://www.w3.org/2000/svg" xmlns:xlink="http://www.w3.org/1999/xlink" style="position: absolute; width: 0; height: 0">
            ${res.join('')}
          </svg>
      `
    )
  }
}
}
stept7: 最后在vite.config.js修改配置
import { svgBuilder } from './src/plugins/svgBuilder';

export default defineConfig({
plugins: [svgBuilder('./src/icons/svg/')] // 这里已经将src/icons/svg/下的svg全部导入,无需再单独导入
})
总结
关于如何在vue3+vite项目中使用svg的文章就介绍至此,更多相关vue3+vite使用svg内容请搜索编程宝库以前的文章,希望以后支持编程宝库!
(1)介绍:clipboard.js是一款轻量级的实现复制文本到剪贴板功能的JavaScript插件。通过该插件可以将输入框,文本域,DIV元素中的文本等文本内容复制到剪贴板中clipboard ...